Back in August we set out on the adventure of making our own lures, and nearly created a molten lead statue of Jason (see the blog post Molten Lead Is HOT). The goal was to make our own version of the Spro Bucktail jigs which we use frequently and which cost around $4.00 each plus shipping, on sale. It is possible that price sounds reasonable to the casual reader; however we can lose a couple of jigs a night when the snook are really active and out in force, and after a while that can add up, and without corporate sponsors, a habit like that is hard to keep up and still eat.So, if we can make our own for less, then that would be a good thing, right? Costs less and you get that satisfaction of fooling fish with a lure you made yourself. Self-satisfaction all around.

Since our initial lead pouring, jig head creation start, we had then to learn the more difficult part of jig making, which is the finishing of the jig creation. Pouring lead is a brute force effort without much artistic or creativity involved, but the remaining steps of transforming a piece of lead into a working fishing lure involves “soft skills”. To develop those skills, we first had to invest time in searching and watching various YouTube videos of other fishermen completing the final steps. As with all such tasks, each person has his/her own way. After a number of viewings, we took the best from each and had to do the hardest part of the learning, which is taking the theory and putting in into practice, which is often a whole different thing.
First things first – getting the materials. Fortunately, there are many sources for materials on the internet. Paint, buck tail (hence the name Bucktail jigs), eyeballs, glue, clear nail polish, thread, and crystal flash (can’t forget that now can we?). We decided to go with synthetic hair in place of natural buck tail, which is actually the hair from the tail of a white tail deer. No deer were harmed in the making of these jigs. Most of the other items were quickly ordered and received. That was not the case with the eyes. There are only a few sources of quality eyes it appears, and one of them which seemed to have the best variety was from China. Teresa ordered the eyes about the same time as the other materials, but they did not arrive with the others. In fact I believe that not only were they made in China, they were stored in a warehouse in China, and had to be shipped across the ocean (apparently on a slow boat from China) to reach us. A month later, the small envelope of eyes arrived.

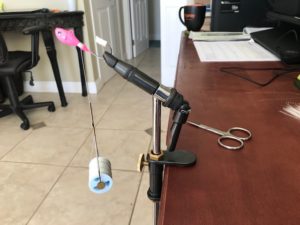
Once we had the materials, I had to get the tools to do the tying. Fortunately, I had a trout fly tying kit which included the key tools including a vice, scissors, bobbin, whip knot tool, and other associated stuff that can be used to fancy up a fly (or jig in this case). Now here I sat with all the stuff, tools, video knowledge, and painted jig heads just ready for mass production of killer snook jigs which would save us $$. A few minutes per jig like the guys on the video and there you go. Instant gratification. Well as you can guess, the guys on the videos were well experienced and had gone through the school of hard knocks to perfect what they presented on the silver screen. To say things were slow and aggravating to begin with is an understatement. As you can see in the picture of my vice and jig, there is a piece of foam on the end of the hook. Wanna know why there is a piece of foam on the end of the hook? Well after the first few times of slicing my finger with the exposed hook point while winding the thread around the shank of the jig, I thought there should be some protection from that thing. None of the guys on the instructional videos had one of those – but I do now!
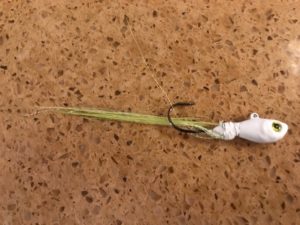
After some pain, suffering, frustration, and perseverance, Snook Slayer jig version 1.0 was ready to roll. Out to the water we went to give it a test run. After a few casts, it was determined that the profile was not right. It needed more hair and flair to create a natural small fish like shape. Also, the hair was pulling out, the paint was chipping from sliding on the sandy ocean bottom, and I think the eyes fell off when the first Ladyfish had a shot at it. The Ladyfish test was a tough test to be fair as they can tear up even the production Spro Jigs with their powerful hits and sharp teeth. Back to the workbench. Version 1.1 included some additional hair and flair, clear coat nail polish on the head and eyes. Back to the water to test the refinements. Unfortunately as time passed, the red tide had created a lack of snook (or even Ladyfish) to determine if the new versions and color combinations were going to work.
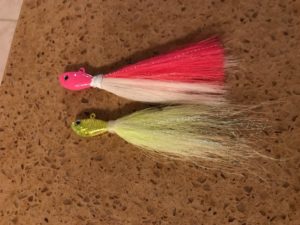
On a slow day, I decided to break with the color imitation of the Spro jigs I was using, and create my own combination. Since I was developing more skills by experience in tying the jigs, this one only took a few minutes like the guys on YouTube. As you see in the cover photo for this blog, it was a beautiful creation. Never has a mother had an ugly baby, right? I gave Jason my newest creation for experimentation and he was quickly rewarded with a nice snook. After the battle was over and the snook was on the beach, we evaluated the endurance of our home cooked jig. It did not fare too well in the big snook test. Not much left but a few strands of hair.  Back to the drawing board once again, but with the knowledge that the shape and color combination appears to be right to lure a snook to hit. Unfortunately, we also will need snook around to make further progress, and since the red tide, they are few and far between.
Now that we have achieved some manner of initial success, we have returned to our original premise – making our own jigs which would reduce the costs of buying Spro jigs from the online store. After some number crunching, calculating the cost of the jig mold, lead, paint, hair, eyes, flash tinsel, thread, hooks, and labor costs for the jig tying (not including my fly tying vice and associated tying hardware) I figure each jig only costs about $150.00 or so. To be fair, the materials we have in our initial purchase can make around 50 jigs, so if we max out the materials, maybe we can reach the $4.00 average cost. The next run of jigs will be made at a lower cost per unit as the initial investment has been made. Maybe by next year we will break even, and then it is all gravy from there. Even if we do not save a fortune, what is the value of the experience and the reward of creating something that is useful, practical, and fools a picky snook into thinking this piece of lead and synthetic hair is a living fish? The learning was well worth the investment.
David


2 Comments
Mary Ellen Bolme
I always enjoy your fish stories, David. Thanks for your updates.. Lol.
David Bolme
Thank you, I enjoy writing them. I wish there were more fish to be telling stories about, but still finding adventures anyway.